Atomsk
The Swiss-army knife of atomic simulations

The Swiss-army knife of atomic simulations


This tutorial explains how to cut an atomic system, using a 3-D shape defined in an STL file.
▶ For more information, refer to the corresponding documentation page.
The STL file format is widely used in 3-D printing. In this format, the surface of a 3-D shape is defined by a set of triangles.
In Atomsk, it is possible to read a 3-D shape from a STL file, and select atoms that are inside (or outside) this 3-D shape. Then, it is possible to remove those atoms, substitute them, and much more.
Note that, if you want to select a simple geometric shape, then going through STL files may be overcomplicated. Have a look at the previous tutorials showing how to select boxes or spheres, and how to design masks. Then, if you truly want to select atoms according to a sophisticated 3-D shape, then the present tutorial may be useful.
As a pre-requisite, you must of course have a suitable STL file. Two possibilities:
you may design one yourself, using 3-D softwares like Tinkercad, Blender, Google Sketchup, or similar softwares;
or, you may download an existing 3-D model from an online Website, like Cults3D, Pinshape, Thingiverse, or other sources.
This tutorial will not explain how to design a 3-D model, it is completely out of the scope of this documentation. If you want to learn how to use a 3-D software, then turn to the community of that software, ask your questions and follow a training.
For the purpose of this tutorial, we will use the following STL file: Dog_lowpoly_flowalistik.STL. It can also be downloaded for free from this page at Cults3D. If you open it with a 3-D software like Blender, you will see that it represents a dog with a small number of polygons (the individual triangles can be seen):
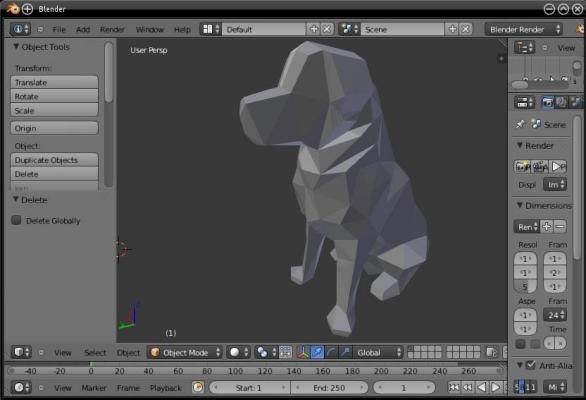
Although this model is obviously of little interest to materials science, it will serve the purpose of this tutorial: show that complex shapes can be selected with Atomsk, and how to center and rescale them.
As a second pre-requisite, you must of course have a supercell of whatever material you want to cut. For the sake of example, let us simply generate a supercell of aluminium:
atomsk --create fcc 4.046 Al -duplicate 40 40 40 Al_supercell.xsf
For now, the box is completely filled with Al atoms.
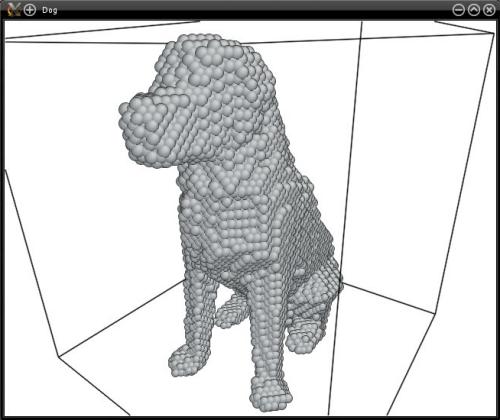
Now, let us cut the aluminium supercell, using the dog shape. Use the option "-select stl" to select atoms that are inside of the dog; Atomsk will automatically rescale the dog, so that it fits in the aluminium supercell. However it will not center the 3-D model; to do that, use the keyword "center". Then invert the selection, so that the atoms outside of the dog are selected. And finally, remove the selected atoms:
atomsk Al_supercell.xsf -select stl center Dog_lowpoly_flowalistik.STL -select invert -rmatom select Dog.cfg
Now you may visualize the resulting system with Atomeye:
You may try to vary the size of the supercell: the 3-D model is automatically rescaled.
Instead of removing atoms (with option "-rmatom"), you may replace them with atoms of another type (using the option "-substitute").