Atomsk
The Swiss-army knife of atomic simulations

The Swiss-army knife of atomic simulations


This tutorial explains how to construct a ½[110] dislocation loop in aluminium. It is recommended to be familiar with the theory of dislocations in order to follow the steps below.
▶ For more information, refer to the corresponding documentation page.
ⓘ This tutorial is about glide dislocation loops, i.e. where the Burgers vector is contained in the plane of the loop. For climb dislocation loops (vacancy or interstitial loops), refer to this tutorial.
As in previous tutorials, the supercell must have the appropriate crystal orientation. In addition, it must be large enough along all directions to host a dislocation loop:
atomsk --create fcc 4.046 Al orient [110] [1-12] [-111] -duplicate 60 40 20 Al_supercell.xsf
The dislocation loop is defined by the position of its center (x,y,z), the normal n to its plane, its radius R, and its Burgers vector b. In addition, its is necessary to specify the Poisson ratio of the material.
First, let us think about the design of our system, and take the time to write it down. We want to place the dislocation loop at the center of the box; for this, we can use the formula "0.5*box" along each direction. In aluminium, dislocations typically spread in {111} planes. Since we chose Z=[-111] earlier, we use n=Z. Then, let us use a radius of 30 Å. The Burgers vector must be ½[110], which is in our coordinate system b = (bx 0 0), where bx = a0/√2 ≈ 2.860954 Å. Finally, the Poisson ratio of aluminium is about 0.33.
With all that information, the construction of this loop is performed as follows:
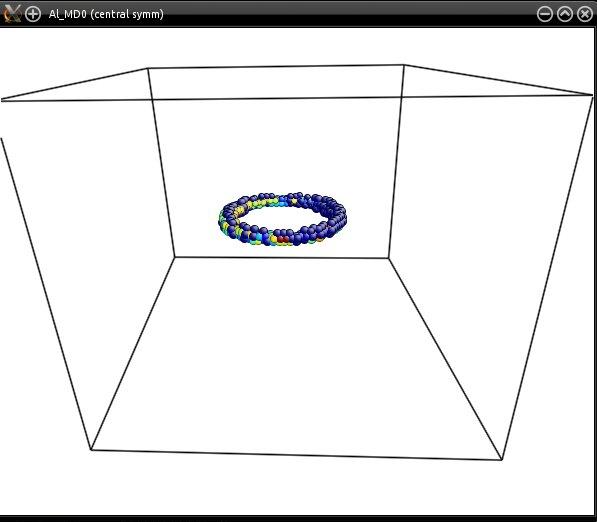
atomsk Al_supercell.xsf -disloc loop 0.501*box 0.501*box 0.501*box Z 30 2.860954 0 0 0.33 Al_loop.cfg
ⓘ For this type of dislocation loop, the Burgers vector b belongs to the plane of the loop. In this case, the loop is normal to Z, and b is along X.
You may open the final CFG file with Atomeye, and trigger the central symmetry parameter (Alt+H) to preview the dislocation loop:
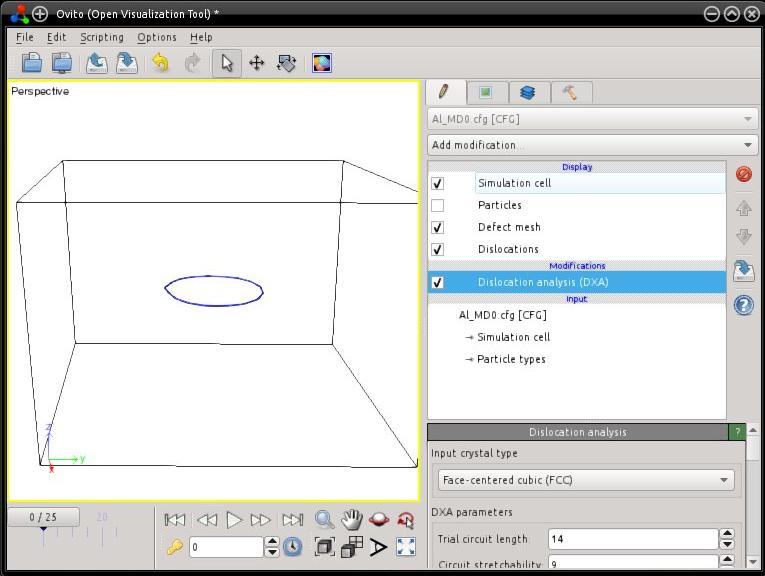
You may also open this file with OVITO, and actionate the dislocation analysis algorithm (DXA) to have a coarsed view of the dislocation line (make sure to choose the FCC lattice). This tool also allows to check the Burgers vector of the dislocation (to know more, refer to the documentation of OVITO).
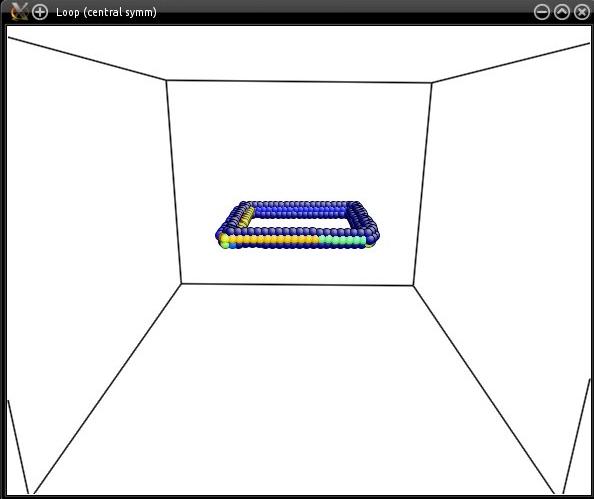
Instead of a circular loop, it is possible to introduce a loop with a square shape. The only thing to modify is the loop radius: by providing a negative radius, Atomsk will automatically construct a squared loop, and the side of the square will have a length equal to twice the absolute value of the provided "radius". This makes the side of the square comparable to the diameter of the circular loop above.
Let us modify the above example, and use a radius of -30 Å:
atomsk Al_supercell.xsf -disloc loop 0.501*box 0.501*box 0.501*box Z -30 2.860954 0 0 0.33 Al_loop2.cfg
The loop is then a square of side 60 Å, as shown by visualization:
The option "-dislocation" allows to introduce dislocation loops that belong to a plane normal to a Cartesian axis. But sometimes, one wants to introduce a dislocation loop in a plane that is inclined. This can be achieved by rotating the crystal (with the option "-rotate", or the option "-orient"), so that the target plane is normal to a Cartesian axis, and then use the option "-dislocation".
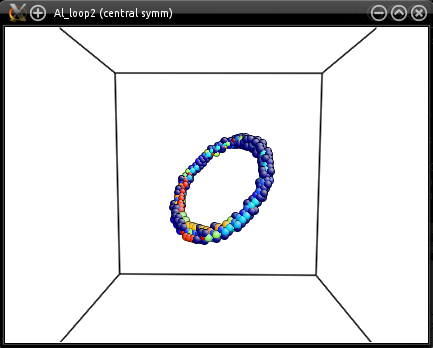
As an example, let us construct a non-oriented supercell of aluminium, i.e. X=[100], Y=[010], Z=[001], and assume that we want to intruduce a dislocation loop of Burgers vector b=½[110] in the (111) plane. First, rotate the crystal with the option "-orient", so that the (111) plane is normal to the Z axis, and the [110] direction is along X. Then we can use the option "-dislocation" to introduce the loop. Finally, the system may be rotated back to its original orientation thanks to the option "-alignx":
atomsk --create fcc 4.046 Al -duplicate 40 40 40 \
-orient [100] [010] [001] [1-10] [11-2] [111] \
-disloc loop 0.501*box 0.501*box 0.501*box Z 30 2.860954 0 0 0.33 \
-alignx Al_loop2.cfg
Visualization shows that the loop was introduced in the right plane:
If you wish to introduce a partial loop, i.e. a loop that crosses a surface, just place the center of the loop outside of the box. Atomsk will display a warning that some points of the loop are outside of the box, but it will proceed to creating the loop.
As an example, let us modify the loop introduced in the previous example, and place it outside of the box:
atomsk --create fcc 4.046 Al -duplicate 40 40 40 \
-orient [100] [010] [001] [1-10] [11-2] [111] \
-disloc loop -60 0.6*box 0.7*box Z 50 2.860954 0 0 0.33 \
-alignx Al_loop3.cfg
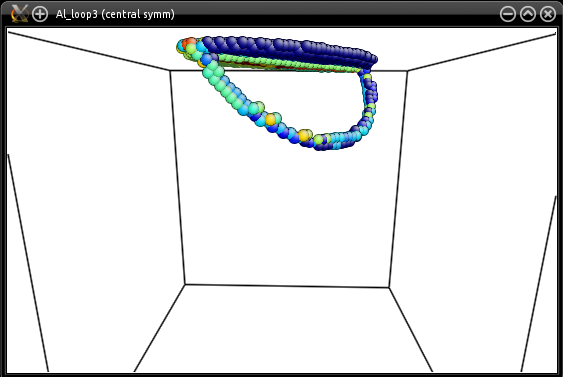
You may play with the position and th radius of the loop to obtain different results.
Just like straight dislocations, you may introduce several loops in an atomic system by calling the option "-dislocation" several times. It is also possible to use the option "-orient" several times, to introduce loops in different slip systems. You may even introduce a distribution of straight dislocations and loops, if you wish.
As in the previous tutorials, when introducing dislocation loops one must be very careful about the Burgers vector, the plane, and the position of the loop. Do not hesitate to try different supercell sizes, different positions and radius of the loop. If some points of the loop are out of the box, Atomsk will display a warning. Note that the option "-dislocation" does not use periodic boundary conditions, so if some points of the loop are out of the box, they will not be wrapped or anything: they will be completely out of the system.
Finally, just like for straight dislocations, the dislocation loop introduced here is not relaxed nor optimized. However it may be useful as input for a simulation. Note that glide dislocation loops are known to be unstable, due to attraction between opposite segments of the loop: if you simply perform static relaxation or molecular dynamics, then the loop will close and collapse, leaving only perfect crystal. Stress must be applied to stabilize or expand the loop. If you are unsure about how to proceed, please refer to a book about dislocations to learn more.