Atomsk
The Swiss-army knife of atomic simulations

The Swiss-army knife of atomic simulations


In this first tutorial you will learn how to install Atomsk on your computer, and how to run it. Atomsk is a command-line program, hence it is recommended to be familiar with the terminal prompt and with basic commands in your operating system in order to use it.
⨻ It seems that no binary version of Atomsk is available for your platform. If a Fortran compiler is available for your platform, you may download the source code and compile it.
If no executable version of Atomsk exist for your system, or if you wish to compile it yourself, then you may download the source code and compile it on your machine.
(1) Install the following programs on your system: GNU make; GNU Fortran compiler (or another Fortran 95 compiler available for your platform); and LAPACK. For example, on Debian-based systems, you can install them with the following command:
sudo apt-get install make gfortran liblapack-dev
If you use a different compiler than GNU Fortran compiler, you will have to create a Makefile; see the documentation page to know more. Then, if no binary version of LAPACK exist for your system, then you will have to compile LAPACK before compiling Atomsk (please turn to the LAPACK community for anything related to LAPACK).
(2) Download the source code of Atomsk from this page: https://atomsk.univ-lille.fr/dl.php
(3) Open a terminal, go to the directory where the file was downloaded, for example:
cd Downloads
Unpack the archive (you may also right-click and choose "Extract here" from a file explorer):
tar -xzvf atomsk_b0.13.1.tar.gz
Then, enter the directory, and go to the "/src/" directory:
cd atomsk_b0.13.1
cd src
(4) Once in the "/src/" directory of Atomsk, start the compilation:
make atomsk
Note that you do not need super-user rights to compile (don't use su or sudo).
(5) If the compilation is successful, and if you have super-user rights on the machine, you may install Atomsk on your machine with:
sudo make install
Congratulations, Atomsk is installed! You may now run it from any working directory. For instance, if you wish to create a unit cell of fcc aluminium, the command should look like the following:
atomsk --create fcc 4.02 Al aluminium.xsf
NOTE: for more information about the compilation (using a different compiler, setting up the Makefile, etc.), please refer to the documentation.
By default, Atomsk writes files in the current working directory, i.e. the directory where you are when you run Atomsk. Here are a few useful commands to know your way around:
These commands work in both GNU/Linux, in macOS®, and in Windows® Power Shell.
Of course, you can also use a graphical file manager to access these files.
Ready-to-use binary versions of Atomsk are available for GNU/Linux systems. These binaries are compiled statically, which means that they contain all they need to run, and you do not have to worry about installing any additional library: they should work out-of-the-box.
If you are not sure if your system is 32 or 64-bits, run the following command:
lscpu
Check the line "Architecture": if it states "x86_64" then your system is 64-bits, otherwise it is 32-bits.
Download the Linux binary version of Atomsk from this page: https://atomsk.univ-lille.fr/dl.php
Open a terminal, go to the directory where the file was downloaded, for example:
cd Downloads
Unpack the archive (the xxx characters must be replaced according to the version you downloaded):
tar -xzvf atomsk_b0.13.1_Linux-xxx.tar.gz
Then, enter the directory:
cd atomsk_b0.13.1_Linux-xxx
Then, run the installation script "install.sh". Beware that you need super-user rights to install it:
sudo bash install.sh
When prompted, enter your password. That will install Atomsk in the folder /usr/local/bin so that every user can run it from any working directory.
If you do not have root access to your computer, e.g. on a distant cluster, you may set up your user environment to run Atomsk from your home directory.
Then, when Atomsk is installed, you may run it from any working directory. For instance, if you wish to create a unit cell of fcc aluminium, the command should look like the following:
atomsk --create fcc 4.02 Al aluminium.xsf
To obtain help about a mode or an option, run the program with the argument "--help". You can add the keyword "modes" to get specific help about modes, or "options" to get help with options:
atomsk --help
atomsk --help modes
atomsk --help options
During installation, the documentation of Atomsk is also installed on your computer. You can access it by entering the following address in your browser (save it as a bookmark to access it easily):
/usr/local/share/doc/atomsk/index.html
Atomsk is available in the form of deb packages for Debian-based systems, which include Ubuntu, Linux Mint and other similar distributions.
First, make sure that you have super-user rights on the computer (either using "su" or "sudo"). Then, you should know the architecture of the machine (32 or 64-bits), otherwise you can check by running the following command:
lscpu
Check the line "Architecture": if it states "x86_64" then your system is 64-bits, otherwise it is 32-bits.
Download the deb package of Atomsk corresponding to your architecture from this page: https://atomsk.univ-lille.fr/dl.php
Finally, double-click on the .deb file that you downloaded, and proceed with the installation of the package. Alternatively, you may install the package in the command-line:
sudo dpkg -i atomsk_0.13.1_amd64.deb
No further step is needed, you can readily use Atomsk in your command-line, for example:
atomsk --create fcc 4.02 Al aluminium.xsf
To obtain help about a mode or an option, run the program with the argument "--help". You can add the keyword "modes" to get specific help about modes, or "options" to get help with options:
atomsk --help
atomsk --help modes
atomsk --help options
During installation, the documentation of Atomsk is also installed on your computer. You can access it by entering the following address in your browser (save it as a bookmark to access it easily):
/usr/local/share/doc/atomsk/index.html
First, download the Microsoft® Windows® version of Atomsk from the Web site: https://atomsk.univ-lille.fr/dl.php
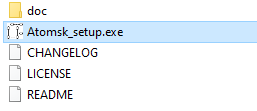
Second, unzip the archive by doing a right-click on the file, and choosing "Extract here".
Third, enter the directory named "atomsk_b0.13.1_Windows" and run the installation setup:
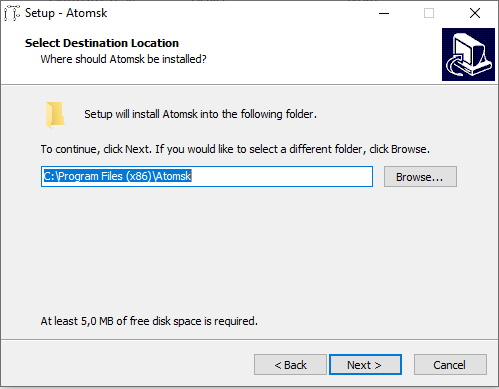
During the installation, pay attention to the installation path. By default it should be "C:\Program Files (x86)\Atomsk\", or "C:\Program Files\Atomsk\" if you are running a 32-bits version of Windows®:
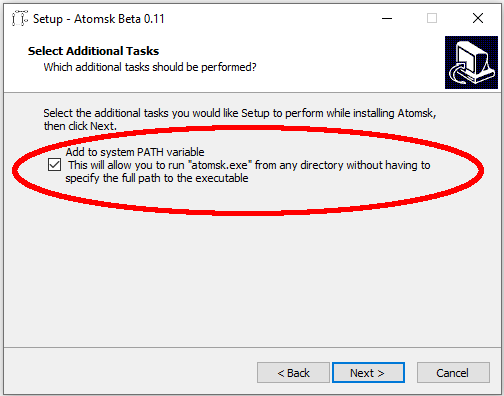
The installer proposes to add the path to the executable "atomsk.exe" to your PATH variable. This is recommended to facilitate the use of Atomsk: you will be able to just run "atomsk.exe" from any working directory. If you un-check this box, then you will have to enter the full path to the executable every time you want to run Atomsk.
Then, click on the "Next" button until the installation completes. Congratulations, Atomsk is installed on your computer!
ⓘ IMPORTANT NOTE: after installation, you should not run Atomsk by clicking the shortcut from the Windows® menu! If you do, then Atomsk will run in interactive mode, where only a limited set of commands can be used (see documentation).
To run Atomsk, go to the Windows menu, click Accessories, and open Windows® Power Shell. It will open a command-line prompt that looks like the following:
PS C:\Users\login>
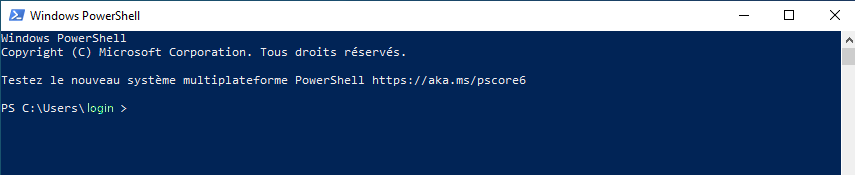
The word "login" is replaced by your actual user name. It shows you that by default, the working directory is "C:\Users\login". You may create a new directory with "mkdir", and then go into it with "cd", for example:
mkdir test_atomsk
cd test_atomsk
Inside this directory, you can run "atomsk.exe" followed by your arguments. For instance, if you wish to create a unit cell of fcc aluminium, the command should look like the following (the actual path to Atomsk may depend on your version of Windows® and on the options you chose during installation):
& 'atomsk.exe' --create fcc 4.02 Al aluminium.xsf

To obtain help about a mode or an option, run the program with the argument "--help". You can add the keyword "modes" to get specific help about modes, or "options" to get help with options:
& 'atomsk.exe' --help
& 'atomsk.exe' --help modes
& 'atomsk.exe' --help options